Friday, 4 May 2012
Saturday, 17 March 2012
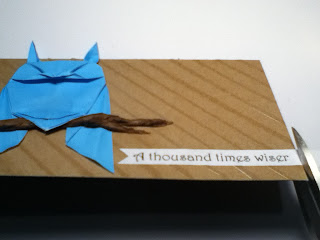
Owl Birthday Card
Hi! Here's a demonstration on making an owl birthday card with an origami owl.
1. Cut a 15 cm by 18 cm rectangle from craft card stock.
2. Score at the middle (@9 cm) and fold in half to make a 9 cm by 15cm card
3. To emboss diagonal stripes on the card with white glue, you will need a ruler, white glue and cover other side of the card with paper.
4. Place the ruler on the card diagonally. I am using a right triangle ruler to make life easier, but you don't have to. Slowly squeeze glue along the edge of the ruler. Then, carefully LIFT the ruler up, don't slide it or glue will get everywhere. You can measure where the next line goes, but I just eyeball it since it's easier. My lines are about 1.2 cm apart.
5. Let the glue dry and it should look like this. It's not perfect and it doesn't have to be, it's a handmade card after all. :)
6. I folded an origami owl from Peter Engel's book, Origami Odyssey. Of course you can use different owls, not origami or origami.
7. Adhere the owl to the left side of the card . I left the ears, wings, and feet not glued to the card.
8. Tear a piece of brown tissue paper.
9. Form the branches by crunching, then twisting.
10. Place the branch under the feet and over the wings. Glue between the feet branch and card.
11. At the edge of the card, glue the branch down. Then, trim off the extra length.
12. Glue the tip of the branch down.
13. Make a smaller branch and attach it to the bigger branch and card.
14. Use a toothpick with a drop of glue to secure at small areas.
15. I printed out part of the sentiment, a thousand times wiser, using the font Harrington at size 19.
I cut the sentiment in to about 1 cm wide paper. At the left end, I cut a triangle to make it look like a flag.
16. Using an empty pen, I wrote over the printed words for an embossed, finished look.
17. Glue the sentiment and trim the excess paper.
18. Cut a strip of yellow pastel paper that is about 0.6 cm wide.
19. Hand write the rest of the sentiment, one year older..., and glue it above the printed sentiment. And you're finished!
Saturday, 25 February 2012
How to Fold a Pretty Origami Rose
Hello Everyone! Here is a tutorial of how to fold an origami rose, with six sides.
It is based on the traditional origami rose, with four petals, and I used it to make an origami rose, with six petals. Definitely as pretty as the original, if not even more. However, it is a bit harder than the original, so i suggest trying that first before this.
You will need to have a regular hexagon paper. You can fold one or print one out with my tutorial on how to fold a hexagon here: http://loreleililly.blogspot.com/2011/07/origami-hexagon.html .
Lets get started!
There are two parts, click on the video to play!
Part one- Hexagon Rose Base:
Part two- Collapse the rose:
I hope the videos are pretty clear to understand. If you have any questions feel free to ask!
Wednesday, 20 July 2011
Origami Hexagon
Hi everyone! This post is a tutorial on how to fold a hexagon.My next post will be "How to fold an origami six-petal rose" and you will need a hexagon to fold it. The six-petal rose is really pretty and is similar to the normal, traditional version.
Here is the tutorial of how to make a hexagon:
Of course, you can just print out a hexagon and cut it out instead.
Here is a template of a hexagon (for all you lazy people ;D):
Copy image or save.
There you go!
Sunday, 17 July 2011
A Simple Introduction
Hello.
I have decided to start this blog to share my creative thoughts and ideas. I am inspired by many other crafting blogs to create my own. By following my entrys, I will teach you to make my creations.
Things that I really love and will be posting about:
I have decided to start this blog to share my creative thoughts and ideas. I am inspired by many other crafting blogs to create my own. By following my entrys, I will teach you to make my creations.
Things that I really love and will be posting about:
- Origami
- Card Making
- Flowers!
-Isabel
Subscribe to:
Comments (Atom)


